Som vanligt blir det mest kort och sånt här i bloggen numera, men det kanske blir ändring på det framöver. Känner mig för lat för att orka ta mig iväg och fota saker, men jag hoppas att inspirationen kommer tillbaka någongång så att jag kan ta min nya kamera och gå ut och fotografera igen.
Men för tillfället blir det mest kort som sagt och idag är inget undantag. Har gjort ett kort till ett företag som heter The Paper Nest och jag har använt en digital bild som kallas Fairy Under Mushroom. Är alltid bra att ha en uppsättning Tack-kort att kunna ge bort lite då och då.
---------------------
Today I want to show you a new card I have made for The Paper Nest using an image I really
like. It is the Fairy Under Mushroom image. I just love all of those
little fairy images.
I colored this image with copic markers, but unfortunately I didn't
really get the coloring as good as I wanted to. I don't know what
happened the day I did the card, things just kept ending badly for me. I
redid the coloring about 3 times and this was the best one I got. Not
that I have ever been very good at coloring images, but this time I
think I might have lost any talent I previously had. But it's ok anyway,
I guess all of us have bad days every now and then right?
This
card is pretty simple and I just used white cardstock, a piece of
patterned paper, a spellbinders die, some washi tape and stickles. I did
some paper piecing by printing the mushroom and fairy wings twice and
glues them down on the image to get some more dimension to the card. And
of course I had to add stickles to the wings.
Showing posts with label The Paper Nest Dolls. Show all posts
Tuesday, May 14, 2013
Thank You
Etiketter:
Crafts,
Design Team,
The Paper Nest Dolls
Saturday, April 27, 2013
I love you
Idag är jag på kattutställning så det är bara att hålla tummarna att det går bra.
Medan jag är på utställning så passar jag på att schemalägga ett inlägg här där jag visar upp veckans kort från The Paper Nest Dolls. Denna gång har jag färlagt bilder med akvarellfärg, eller nått liknande i alla fall.
-----------------------
Now it's time for this weeks post for The Paper Nest Dolls.
I have made this card with a cure stamp called Girl With Kite. For a change I colored the image using my Distress Markers and a water brush. Kind of like the effect it gave. Hope you like it.
Medan jag är på utställning så passar jag på att schemalägga ett inlägg här där jag visar upp veckans kort från The Paper Nest Dolls. Denna gång har jag färlagt bilder med akvarellfärg, eller nått liknande i alla fall.
-----------------------
Now it's time for this weeks post for The Paper Nest Dolls.
I have made this card with a cure stamp called Girl With Kite. For a change I colored the image using my Distress Markers and a water brush. Kind of like the effect it gave. Hope you like it.
Etiketter:
Crafts,
Design Team,
The Paper Nest Dolls
Friday, April 19, 2013
Old, New, Borrowed, and Blue Blog Hop
For my project today, I made a blue card using the image of Avery in her wedding dress. I colored the image with my copic markers and used a super cute die from spellbinders.
Wedding bells will soon be ringing as the wedding season is almost here, and the design teams of Red Carpet Studio and The Paper Nest Dolls have teamed up to provide you with some beautiful wedding inspiration by creating projects using Paper Nest Dolls digital stamps! If you've just come across the hop and would like to start at the beginning, please visit Red Carpet Studio.
Red Carpet Studio is a movie-themed challenge blog that runs weekly challenges, alternating between layout and card challenges each week. All of their challenges are inspired by either a movie or aspect of Hollywood!
The Paper Nest Dolls is a brand new digital/rubber stamp shop that sells adorable stamps inspired by the designer's children. Their stamps are sold here and they just started a challenge blog as well!
The Paper Nest Dolls owner and artist, Christine, is very generously providing us with some blog candy from her online stamp shop and her brick and mortar scrapbooking store! To be eligible to win you must comment on every stop of both days of the hop.
Two $20 Gift Certificates
Prima Flower Prize Pack
Ready for the next stop? It's Dawn's blog!
Red Carpet Studio
The Paper Nest Dolls
Tonya
Lori Ann
Chas
Kelly
Kim
Erika - you are here
Dawn
Lydia
Anneliese
Darcy
Sandra
Happy Hopping! :)
Etiketter:
Blog Hop,
Design Team,
The Paper Nest Dolls
Monday, April 15, 2013
Sending Hugs
Idag är det dags att via ett nytt kort från The Paper Nest Dolls. Tyckte denna lilla älvflicka var så söt så jag valde att göra ett kort med henne.
-----------------------
Today I want to show you a new card I made with an image from The Paper Nest Dolls. I got some wonderful stamps from The Paper Nest to work with and I chose this cute little fairy called "Faerie With Flower Umbrella". Isn't it the most adorable image?
This card is made using some great patterned papers from the Echo Park Sweet Day Collection. I just loved this 6x6 paper pad and I think they worked so well together with the digital image.
As usual the image is colored with Copic Markers and unfortunately I can't remember what colors I used. For some reason I always forget to write that down and by the time I put my markers back I forget which one I used.
On the little fairy wings I added some diamond stickles as a final touch. Love the way they turned out.
Hope you like the card
-----------------------
Today I want to show you a new card I made with an image from The Paper Nest Dolls. I got some wonderful stamps from The Paper Nest to work with and I chose this cute little fairy called "Faerie With Flower Umbrella". Isn't it the most adorable image?
This card is made using some great patterned papers from the Echo Park Sweet Day Collection. I just loved this 6x6 paper pad and I think they worked so well together with the digital image.
As usual the image is colored with Copic Markers and unfortunately I can't remember what colors I used. For some reason I always forget to write that down and by the time I put my markers back I forget which one I used.
On the little fairy wings I added some diamond stickles as a final touch. Love the way they turned out.
Hope you like the card
Etiketter:
Crafts,
Design Team,
The Paper Nest Dolls
Sunday, March 31, 2013
The Dolls
Idag är det dags för ännu ett DT inlägg. Har gjort ett kort för The Paper Nest Dolls med en av deras digitala stämplar. Jag har skrivit ut bilden på ett tjockare papper och sedan färglagt det med Copic Markers.
----------------------
Today I wanted to show you a new card that I have for The Paper Nest Dolls DT. It is made using one of the digital stamps called The Dolls. It is a great image that can be used for almost any type of card. I printed the image on white cardstock and started coloring it with my Copic Markers.
Please visit the The Paper Nest Dolls for more great images and cards.
----------------------
Today I wanted to show you a new card that I have for The Paper Nest Dolls DT. It is made using one of the digital stamps called The Dolls. It is a great image that can be used for almost any type of card. I printed the image on white cardstock and started coloring it with my Copic Markers.
Please visit the The Paper Nest Dolls for more great images and cards.
Etiketter:
Copic Markers,
Crafts,
Design Team,
The Paper Nest Dolls
Sunday, March 10, 2013
Thinking Of You
Idag är det dags för ett nytt inlägg för The Paper Nest Dolls. Jag har är en del av design teamet hos dem och får i uppdrag att göra några kort varje vecka med deras digitala stämplar.
Denna gång har jag använt en stämpel som heter Bedime Avery och jag kommer att visa hur jag gjorde detta kort med en bild-tutorial. Den går att se nedan, men finns tyvärr bara på engelska.

------------------------------

Today it is time for another post for The Paper Nest Dolls and I wanted to show you a card I made with the adorable Avery in her pajamas. I decided to make this post in to a tutorial of how I did the card, so I hope you'll enjoy it.
Denna gång har jag använt en stämpel som heter Bedime Avery och jag kommer att visa hur jag gjorde detta kort med en bild-tutorial. Den går att se nedan, men finns tyvärr bara på engelska.
------------------------------

Today it is time for another post for The Paper Nest Dolls and I wanted to show you a card I made with the adorable Avery in her pajamas. I decided to make this post in to a tutorial of how I did the card, so I hope you'll enjoy it.
Here is the card I will show you how to make.
So, lets start the tutorial.
I
printed the image of Avery onto Letraset Heavy Weight Cardstock and
started picking out some colors of Copic. Since I don't remember what
colors I used I won't try to make a list with the numbers. You can use
whatever colors you have to color the image.
Here
you can see how I have started coloring the image with some pink
markers. I used three to four different shades for all of my coloring. I
think you get the best blending that way.
When I color I usually start with the darkest color and then work my way
from darkest to lightest. I color in small sections and mostly I go
over the area about two or three times. If I don't like the way it
blends and I can still see where the colors overlap I will go over the
area again.
When I was finished coloring the image it
did my best to cut it out. I have to admit that I am not the best "fuzzy
cutter", but I do what I can. In the smallest areas where I can reach
with my scissors I use an X-Acto knife.
When
I have finally managed to cut out my image I use a brush tip maker, in
this case a Copic Multiliner, and I go around the cut edges and color
them black. I also make sure to cover up any imperfections and correct
any mistakes I have made while cutting. Sometimes I cut away too much
and the black line around the image disappears or I might not cut enough
and I get a white line. In either case the black maker come in handy
when covering up those mistakes.
It also makes the image look more finished.
I then made a standard size card base from some white Bazzill cardstock and folded it.
I
wanted some cute paper to go with my image and I went through my
drawers and found some great papers from the Lawn Fawn "Daphne's Closet"
collection.
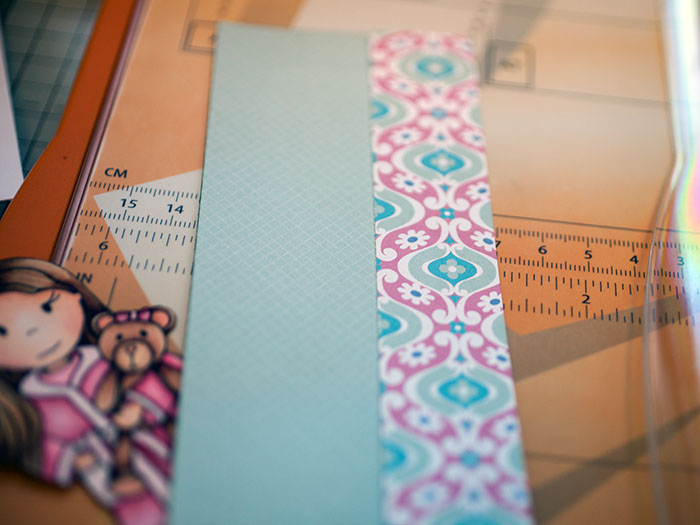
I cut the papers in to two strips that were 1" and 2" wide.
I
also went around the cut pieces with a Distress Marker in the color
Bundled Sage. The papers were a bit blue in color and the pen is green,
but it was the best match I could find and they went pretty well
together.
I
then cut a piece of white cardstock and stamped my sentiment from a
very old Heidi Grace stamp set I had. I made the sentiment strip 2" wide
and used the Distress Marker around the edges of that piece too.
I also found some cute matching washi tape that I cut in to a banner.
I
adhered all of the pieced to my card base and made sure that the washi
tape strip was in the right place and wouldn't show behind the image.
Finally I adhered the colored image and added some pink Stickles to her clothing and the bow on the teddy bear.
I also used a little bit of Glossy Accent to her eyes to make them look more real.
For a final finish I rounded the corners with my 1/2" Corner Chomper from We R Memory Keepers.
And that was my card for today. I hope you guys enjoyed it and I'll be back later this month with another card. Hopefully you'll be able to see my card being made live on YouTube soon, but I still haven't worked up the courage to record a video ;)
Here you can see the finsihed card again.
Etiketter:
Crafts,
Design Team,
The Paper Nest Dolls,
Tutorial
Saturday, February 23, 2013
A special day
Idag visar jag upp mitt första kort som en del av designteamet hos Paper Nest Dolls. Paper Nest designar fina digitala bilder som man kan skriva ut och färglägga och använda på sina kort. Det ska bli riktigt skoj att jobba med detta företag ett tag framöver.
-------------------------------
This is my fist post as a member of The Paper Nest Dolls Design Team and my first card is made with a gorgeous image called Avery with Heart Box. It is just perfect for a card to a loved one.
I made the card thinking I would have a tall card with the opening to the right and therefor I put my background paper that way. Eventually I realized it would look much better if I turned the card to the side. Unfortunately the hearts on the background paper was not turned the right way anymore, but I guess I'll just have to accept that. :)
Etiketter:
Crafts,
Design Team,
The Paper Nest Dolls
Saturday, February 2, 2013
Paper Nest Design Team
Jag kan med glädje meddela idag att jag har blivit en del av design temet hos The Paper Nest Dolls. Det är ett företag som designar jättesöta digitala stämplar. Ska bli spännande att jobba för dem.
----------------------
I am happy to announce that I am now part of the design team over at The Paper Nest Dolls.
They make the most adorable digital stamps and you will be seeing a lot of cards with their designs here on the blog.
----------------------
I am happy to announce that I am now part of the design team over at The Paper Nest Dolls.
They make the most adorable digital stamps and you will be seeing a lot of cards with their designs here on the blog.
Etiketter:
Crafts,
Design Team,
The Paper Nest Dolls
Tuesday, January 22, 2013
Easter boy
Jag skrev i i förra inlägget att det snart var dags för alla hjärtans dag, men det är ju också inte allt för länge till påsk. I alla fall inte om man tänker att jag ska hinna göra påsk-kort innan dess också. Jag brukar ju sällan vara ute i god tid, men jag har i alla fall hunnit med att göra ett kort med påsktema.
Även denna lilla kille som jag använt på kortet är från företaget The Paper Nest.
--------------------------
I have made an easter card with a digital stamp from The Paper Nest. Isn't he adorable?
I printed him on my printer and colored him with Copic Markers. I also cut him out and used foam squares to adhere him to another printed image to give it some dimension.
The sentiment stamp is from Paper Smooches
Även denna lilla kille som jag använt på kortet är från företaget The Paper Nest.
--------------------------
I have made an easter card with a digital stamp from The Paper Nest. Isn't he adorable?
I printed him on my printer and colored him with Copic Markers. I also cut him out and used foam squares to adhere him to another printed image to give it some dimension.
The sentiment stamp is from Paper Smooches
Etiketter:
Crafts,
Design Team,
The Paper Nest Dolls
Monday, January 21, 2013
Be my valentine
Det är ju snart dags för alla hjärtans dag så jag har börjar göra lite kort som passar till denna dag.
Nu är jag väl visserligen ingen som egentligen firar denna dag, men det är altlid kul att kunna göra lite kort med olika teman.
På kortet jag har gjort här har jag använt mig av en stämpel från ett företag som heter The Paper Nest och de gör digitala stämplar som man kan köpa och skriva ut på sin skrivare och sedan färglägga.
-------------------------
With Valentines Day approaching I have been making a few cards for the occasion. I am not really the one who usually celebrate valentines day, but I find if fun to make card that fit the different "themes" of the year.
On this card I have used a digital stamp from a company called The Paper Nest. They make the most adorable little people you can buy and print out.
Nu är jag väl visserligen ingen som egentligen firar denna dag, men det är altlid kul att kunna göra lite kort med olika teman.
På kortet jag har gjort här har jag använt mig av en stämpel från ett företag som heter The Paper Nest och de gör digitala stämplar som man kan köpa och skriva ut på sin skrivare och sedan färglägga.
-------------------------
With Valentines Day approaching I have been making a few cards for the occasion. I am not really the one who usually celebrate valentines day, but I find if fun to make card that fit the different "themes" of the year.
On this card I have used a digital stamp from a company called The Paper Nest. They make the most adorable little people you can buy and print out.
Etiketter:
Crafts,
Design Team,
The Paper Nest Dolls
Subscribe to:
Posts (Atom)